 History of Bottle Cutting
Some of us may remember, when we were too young to know better, how we’d dip a string in kerosene, wrap it around a bottle, and set the string a-fire; our hope was that the bottle would break along the strip. The bottle would break all right, but in half a dozen different directions! A variation of this technique involved wrapping a heating wire around the bottle and turning on the juice. The result was still usually a disaster!
Around the late ’50s and early ’60s, certain trendy restaurants started using water glasses made from wine bottles. The method used to cut the bottles at this juncture of time was a sawing fixture which utilized a rapidly spinning, water-cooled industrial cut-off blade.
In the late ’60s and early ’70s, bottle cutting kits started appearing on the market. The methods at this time were more practical and inexpensive. Basically, a line was etched or scribed around a bottle at the desired location; next, one technique utilized a tapping instrument which was inserted into the bottle and manipulated to impinge against the glass along the score line.
 The other technique utilized a hot and cold application against the glass along the line.
It’s obvious that the water-cooled, rapidly spinning abrassive cut-off wheel is not practical for the average hobbyist in the bottle cutting art. It’s too expensive, too messy, and doesn’t produce clean breaks. The majority of all bottle cutting done today utilizes either of the last two methods mentioned: the tapping method or the hot/cold technique.
The tapping method has its usefulness; this method can be used to split rings of glass and you may find some projects on this site that utilize it. However this method has a couple of drawbacks: the break isn’t always clean, and the tapper can be difficult to manipulate to obtain consistent results!
 So the hot/cold method has been found to be the simplest, cleanest method to cut bottles. Unlike the earlier disasterous results of the kerosene soaked string, or the electric element, the heat is controlled and the subsequent crack develops along a prescribed direction (along the score line) in a very smooth manner. The draw back to this heating method is that if too much heat is applied, it can results in hair line cracks along the score line; but with practice hobbyists will find that this is not too common.
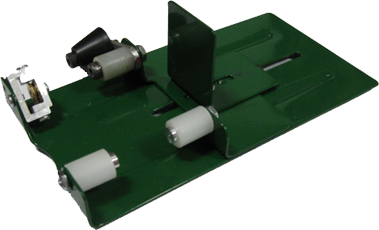
But before the glass is heated to form the crack, a score must be made along its surface. The basic requirements of an etching tool is to scribe a single continuous line along the surface of the glass. To achieve this, two basic features must be met: 1) the cutting wheel must be perpendicular to the glass at all times, and parallel to the direction of the motion for proper tracking; and 2) a guide is necessary to keep the etch straight.
 In the 1970s Ephrem had a desire to take this hobby to another level, simplifying and perfecting it to a degree that even the beginning hobbyist could pick it up and try as easily as a dedicated glass artist. The method to break the bottle was simplified as much as it could be, but the initial etching on the glass was the still the most difficult part of the process. This is where Ephrem’s Bottle Cutter entered the scene.
